Purpose: A way for technical investigators to systematically organize their thoughts for effective analysis while maintaining perfect notes that can easily be transitioned into a report or debrief.
Audience: Anyone performing technical investigations (i.e. incident response, responding to cybersecurity alerts, identifying compromise).
Additional Note: Keep in mind I am heavily biased towards incident response (IR) but, all the steps I describe should be applicable to just about any technical investigation regardless of whether it is a large scale incident or not.
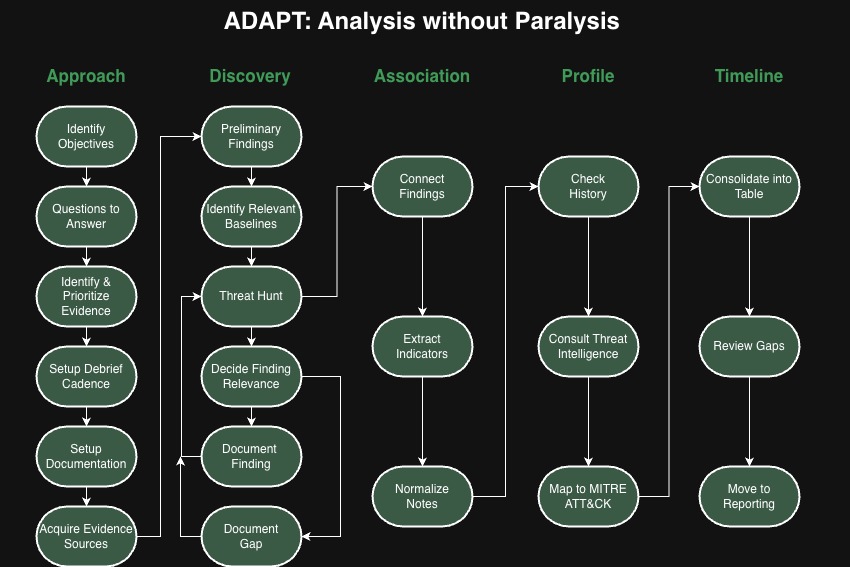
Approach
Before we get into the steps let’s talk about knowing where to look. Having all the shiny tools and perfect log retention is great, but knowing when they are relevant is the real expertise. I like to call these places to look Evidence Sources. For technical investigations you typically have these five types of evidence.
Evidence Sources
- Consoles
- Logs
- Digital Forensics
- Triage Collection
- Intelligence
Identify Objectives
The objective sets the tone for the entire investigation. A clear objective determines how deep you investigate the various threads you will find. Ideally, an incident commander, manager or leadership will set the objective for you, but sometimes you may need to clarify “what does success look like?”. This may seem obvious, but it never hurts to make sure everyone is on the same page.
Examples:
- Bring services back online
- Contain the compromise
- Understand the root cause
- Determine if the activity is malicious
Determine Questions to Answer
An investigation is nothing more than a series or questions that need to be answered. Sometimes the questions are very simple, but they are worthwhile reviewing. Analysis can be broken down into this very simple process.
Question > Evidence > Answer
If you don’t have clear questions, you won’t have clear answers.
Identify and Prioritize Evidence
Asking the right questions will help you determine which evidence sources should be prioritized. You will quickly understand what to look at first and how much time should be committed. In addition, not all evidence sources are easy to acquire, so take some time to understand which ones are worth the effort. Sometimes you need to figure out if the juice is truly worth the squeeze.
Setup Debrief Cadence
Always make sure you plan out when you are debriefing with the team. I always suggest giving analysts at least 1-4 hours in between debriefs depending on the situation. War rooms may seem like a great idea, but it doesn’t allow individuals to focus on the taks they require. Rather than trying to learn how to analyze in a war room, use the war room as a way to bring back everyone on a consistent cadence. This not only keeps everyone aware of the tasks, it forces us to step away and look at the big picture.
This also applies to remote chat rooms. Seeing a constant flow of chat messages and notifications can be just as distracting as a room of people talking.
To be clear this does not mean, avoid working as a team. Just make sure the team is all analyzing the same evidence sources.
Setup Documentation
Use Templates! I have some handy ones for you here, free to use as you want. A blank page is overwhelming, sometimes it’s as simple as outlining the evidence sources or questions you are about to investigate. Whatever your preference, have your notetaking method of choice ready to go so you aren’t worried about where to write your findings. Don’t forget to document those questions you need to answer throughout the investigation.
TIP: Look into ways you can share your notes live. Whether it’s SharePoint, Google Drive or even using a scribe. A scribe is a great way to involve less experienced analysts or even non-technical folks who want to help.
Acquire Evidence Sources
Now that we have a clear approach, we can start to gather the evidence and start looking for findings. If you’ve been reading along, you are probably a little frustrated that we haven’t even started analyzing anything. Well, thats the point. “Jumping In” leads to a lot of problems like duplicated effort, analysis paralysis, wasted time and unclear expectations. Measure twice, cut once.
Discovery
You’ve seen me mention “findings” a few times. You may be wondering that exactly is a finding. A finding is when you identify something within the evidence source that is worth writing down, aka evidence. The reason I like to say finding is because we may not know it’s relevance to the investigation right away, and I don’t want people to think they should only write down events that are clearly malicious. If it’s suspicious it’s a finding.
Document Preliminary Findings
You probably have a few details about what led you the investigation. Make sure you take the time to document those and fill in any details that may have originally been missed.
Identify Relevant Baselines
I One aspect that is crucial to threat hunting and and any investigation is having a reliable baseline. Always try to find a baseline to compare to. A baseline will significantly reduce time spent figuring out if activity is expected.
Examples
- User behavior on workstations
- Try to see if similar findings occur before the expected timeframe
- Understanding standard internal and external network activity
- Deep understanding of what happens in the background of a system
Threat Hunt
You will always have to look for more findings, which is why threat hunting as a skill is crucial. You can always references threat hunting frameworks such as PEAK to help you improve at the Discovery phase. Don’t forget those questions you put together at the start, and you are probably coming up with more questions now. Just rememeber to take your time and work through them one at a time, it can be tough to forget your methodology when you are excited and discovering findings. This phase will be the longest and most difficult so be patient with yourself.
Decide Finding Relevance
One conflict you will likely come across when taking notes is knowing if you “actually” found something. In my opinion, it’s always better to write it down and delete it later, than not writing it at all. However, here are a few tips to help you make the determination of whether it truly is a finding.
How do you know when you found “something”?
- Is it unique?
- What events surround it? (Parent process, associated user, etc)
- Do some research, Google with care
- Phone a friend
- You can always treat it as suspicious and make an true assessment later
Document Finding
You found something! Now that you have your finding, what exactly should you be writing in your notes? There are five specific details you should always include.
Documenting Findings
- Timestamp
- Evidence Source
- Event Description (Objective statement of the event)
- Context (Subjective details, why do you think this is suspicious?)
- Code Snippet (Copy of raw logs, screenshot, file path)
Here are some additional tips to keep in mind as you document your discoveries.
- Don’t forget your template (I got one for everything!).
- Organize your findings by the evidence source.
- Write out your findings in complete sentence, it will help make include all the relevant details
- Remember your audience, they are probably not as technical as you so keep it simple and avoid jargon.
- UTC all day, everyday. Timezones are a pain to keep track and tools are not always consistent.
Document Gap
Sometimes you just don’t find anything notable. While this is typically good news, you still want to document the lack of findings and the associated evidence source. Think about why the evidence source wasn’t useful.
- Evidence was not relevant?
- Missing features? Misconfigured?
- Data not retained long enough?
- Difficult to interpret?
- Team did not have proper expertise?
Association
Connect Findings
Once you have a healthy collection of findings, you should take some time to see how they fit together. You don’t have to wait until you collect all your findings, but remember to go back to Discovery. The easiest way to do this is simply putting the findings in time order. Try to connect network events to host processes, logins to executions and create a clear chain of events. If you see a missing piece, you now have your next question to answer.
Extract Indicators
This is also a helpful stage to extract indicators. Document the indicators in a separate list, it will be helpful later. This also helps unveil commonalities between the indicators such as a IP range, similar usernames or even consistent TTPs.
Types of Indicators
- Network (e.g. IP, DNS)
- File (e.g. File path, SHA256)
- Identity (e.g. Username, Device, Cookie)
Normalize Notes
Since we are often working with various evidence sources, the terminology and naming conventions can differ quite a bit. I always recommend taking a second to use consistent terminology across your notes.
For example, Connected IP or Source Network Address can simply be Source IP.
Normalization can also mean simply clarifying any technical jargon or concepts. Remember, the audience for your report or notes will vary greatly so keep it simple. Secondly, read through your notes and make sure it’s clear why your finding are considered suspicious.
Lastly, check your timestamps. I already mentioned using UTC, but if you want to make it even easier use ISO 8601 (e.g. 2026-01-01T12:34:56Z).
Profile
Check History
You would be surprised how often investigations repeat. Save yourself some time and double check if the findings you’re seeing are similar to a past event. Don’t forget to ask around, maybe you haven’t seen it before, but maybe someone working on the helpdesk has.
Consult Threat Intelligence
Remember that list of indicators you made, now is the time to do a deeper dive into them. Check out past tickets, threat intelligence sources, and even some quick googling. For example, you might find a suspcious domain associated with a specific threat actor or even a detailed report matching what you’ve found so far.
If you are lucky enough, pass this information to any threat intelligence folks that are authorized to support the investigation. You will be surprised what threat intelligence researchers can uncover from just a few indicators.
MITRE Mapping
While threat intelligence is not always our focus, trying to see which MITRE ATT&CK TTPs match up can give you better look at the adversary’s potential attack path.
Timeline
Consolidate Into a Table
Take your findings and put them into a table. Don’t worry about making it too complicated, in fact the more you can simplify it the easier it will be to read. Again, don’t forget the template, but generally you want the following columns. If you have been following along, all of this data should be within your findings.
Columns for Findings
- Timestamp (UTC)
- Origin (Where did the finding start, usually a hostname or IP)
- Target (Where did the finding go (if anywhere), usually a hostname or IP)
- Identity (What user/identity was associated with the activity)
- Evidence Source (Where did you find the evidence Console, Log, Artifact, Report)
- Event Type (2-3 word descriptor of the finding)
- Description (Short sentence summarizing the finding, will not be as detailed as the notes)
- MITRE (Is there a MITRE Tactic or Technique that matches what you see)
TIP: If you feel like you’re not making much progress, this is can be a nice way to recap everything you’ve found while taking a break from hunting.
Review gaps
Simply sort your table by the timestamp and look for gaps.
- Are there any large timeframes that are unaccounted for?
- Can you clearly tell the story from begining to end?
- Do you have more questions to answer?
Move to Reporting
It’s not unusual, to bounce around a few steps especially Discovery > Association > Profile > Timeline. Take your time and work through your questions so you are investigating with purpose. Once you run out of questions, you should be feel comfortable to move to reporting. Keep in mind time and energy is finite, as much as you would love to explore every single possible evidence source you will eventually run out of time and energy.
There’s no shame in that, it’s something every investigator no matter how experienced will run into. The best thing you can do is use the time and energy you have effectively. The other benefit is you now have incredible notes that will make reporting a breeze.
What is the Benefit of doing all this??
- Your notes are a 80% complete report
- You don’t have to rely on your memory to communicate your findings
- Good notes are proof of good work, even after everything concludes
- An easy to understand timeline of events
- Typically a more effective way to show the chain of events
- Makes your report look more polished
- Shows all the evidence you reviewed and what was the most helpful, maybe even a case for budget??
- It’s much easier to make an arguement for changes when you have great notes to show why
I’m always open to any feedback you might have, please reach out anytime if you’ve got ideas. I’ve been working on this for a few years now and glad to have something to put into practice. Another plug to my templates that are meant to exemplify this framework.
If you do happen to use this framework I’d love to hear about your experience! Thank you all for your support over the years it feels like I’m finally putting out something that encompasses the change I want to see!
I’ve also been taking some time drawing a bit more, so hope you like some more custom art (NOT AI!) rather than just stock images 🙂
Terryn Valikodath
Twitter: @CyberCoat
Mastodon: @ChocolateCoat@infosec.exchange
LinkedIn: terrynvalikodath
BlueSky: @ChocolateCoat

Pingback: Week 04 – 2026 – This Week In 4n6